docker-usage
docker 用法
docker教程: https://yeasy.gitbook.io/docker_practice/image/build
运行容器
初次运行
docker run -itd image-id bash
//i 交互 t 终端 d 运行但不关闭,不进入docker
docker exec -it conatainer-id bash
// 进入docker,退出不关闭
docker run -id image-id bash
// 进入docker,退出关闭
删除镜像和容器
https://chinese.freecodecamp.org/news/how-to-remove-images-in-docker/
docker stop container-id
// 关闭容器 docker rm container-id // 删除容器
docker rmi image-id
// 删除镜像 docker stop $(docker ps -a -q)
// 停止所有容器运行 docker rm $(docker ps -a -q)
// 删除所有容器
根据Dockerfile制作镜像
docker buildx build -t hansanf/cuda-11.1:11.1.1-devel-cudnn-ubuntu18.04 --platform=x86_64 . --push
// buildx是制作多架构工具,可以不用 // -t tag, [仓库名]:[镜像tag] //
--platform buildx要制作的哪个平台的镜像 // . Dockerfile的路径 // --push
制作的镜像push到远程仓库,不会保留在本地,可以用 -o type=docker 替换
pull和push
docker pull [仓库名]:[tag]
docker push [仓库名]:[tag]
关闭、打开和重启docker
启动
sudo systemctl start docker
关闭
sudo service docker stop
重启 1
2
3sudo systemctl daemon-reload;
sudo systemctl restart docker;
sudo sudo service docker restart;
容器内进行可视化
设置 DISPLAY 环境变量,令 docker 内外一致, 比如均设置为 :1
冒号不能少
启动容器的时候加上: -e DISPLAY=$DISPLAY -v /tmp/.X11-unix/:/tmp/.X11-unix
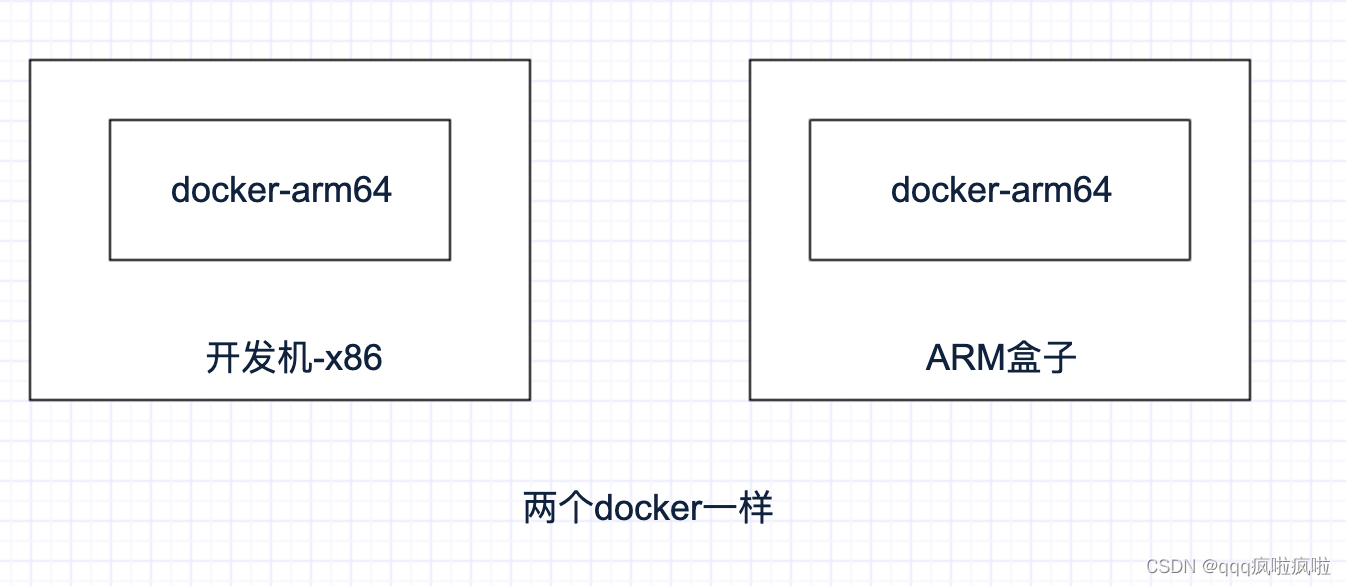
跨平台构建 Docker 镜像
结论:在不使用nvidia的情况下,在开发机x86架构上构建arm64的docker镜像,在该镜像中进行开发,可以直接把程序移植到的arm盒子中运行
跨 CPU 架构编译程序的方法:
方法一:直接在目标硬件上编译
缺点:需每个人都直接操作目标硬件,在硬件资源不充足的情况下开发效率低。 ##### 方法二:模拟目标硬件 通过QEMU(quick emulator)模拟一个完整的操作系统,创建出通用的 ARM 虚拟机,该虚拟机可以引导 Linux,设置开发环境,也可以在虚拟机内编译程序。
缺点:模拟整个系统,包括计时器、内存控制器、总线控制器等硬件,但编译程序不需要这些硬件。 ##### 方法三:使用交叉编译器 类似于方法一,只不过将编译过程放在开发机
方法四:模拟目标硬件的用户空间
QEMU 将通过binfmt_misc(Miscellaneous Binary Format)在 Linux 内核中注册一个二进制转换处理程序,并在程序运行时动态翻译二进制文件,根据需要将系统调用从目标 CPU 架构转换为当前系统的 CPU 架构。最终的效果看起来就像在本地运行目标 CPU 架构的二进制文件。
跨平台构建docker就是方法四的演化
背景: 目前手上ARM盒子只有一个,资源有限; ARM盒子中,程序最终跑在docker里。
目标: 以软件模拟的方式,实现开发机中使用ARM架构下的docker,使开发机中的docker环境和ARM盒子中的一样,从而在开发机中就可以进行移植。
实现路线:
使用 buildx 命令(使用 BuildKit实现的)构建多种系统架构支持的 Docker
镜像 BuildKit:镜像构建组件 1
2
3
4
5
6
7
8
9
10
11
12
13
14
15
16
17
18
19
20
21
22
23
24
25
26
27
28
29
30
31
32
33
34
35
36
37
38
39
40
41
42
43
44
45
46
47
48
49
50
51
52
53(1)启动buildx插件
$ export DOCKER_CLI_EXPERIMENTAL=enabled
验证是否开启
$ docker buildx version
github.com/docker/buildx v0.3.1-tp-docker 6db68d029599c6710a32aa7adcba8e5a344795a7
(2)启动binfmt_misc
$ docker run --rm --privileged tonistiigi/binfmt:latest --install all
验证是 binfmt_misc 否开启:
$ ls -al /proc/sys/fs/binfmt_misc/
总用量 0
总用量 0
-rw-r--r-- 1 root root 0 11月 18 00:12 qemu-aarch64 // 支持arrch64架构
-rw-r--r-- 1 root root 0 11月 18 00:12 qemu-arm
-rw-r--r-- 1 root root 0 11月 18 00:12 qemu-ppc64le
-rw-r--r-- 1 root root 0 11月 18 00:12 qemu-s390x
--w------- 1 root root 0 11月 18 00:09 register
-rw-r--r-- 1 root root 0 11月 18 00:12 status
验证是否启用了arrch64处理器:
$ cat /proc/sys/fs/binfmt_misc/qemu-aarch64
enabled
interpreter /usr/bin/qemu-aarch64
flags: OCF
offset 0
magic 7f454c460201010000000000000000000200b7
mask ffffffffffffff00fffffffffffffffffeffff
(3)新建 builder 实例
$ docker buildx create --use --name=mybuilder-cn --driver docker-container --driver-opt image=dockerpracticesig/buildkit:master
启动构建器
$ docker buildx inspect mybuilder --bootstrap
[+] Building 5.0s (1/1) FINISHED
=> [internal] booting buildkit 5.0s
=> => pulling image moby/buildkit:buildx-stable-1 4.4s
=> => creating container buildx_buildkit_mybuilder0 0.6s
Name: mybuilder
Driver: docker-container
Nodes:
Name: mybuilder0
Endpoint: unix:///var/run/docker.sock
Status: running
Platforms: linux/amd64, linux/arm64, linux/ppc64le, linux/s390x, linux/386, linux/arm/v7, linux/arm/v6
(4)新建 Dockerfile 文件
FROM --platform=$TARGETPLATFORM alpine
RUN uname -a > /os.txt
CMD cat /os.txt
(5)本地创建镜像
$ docker buildx build -t hello-arch-arm64 --platform=linux/arm64 -o type=docker .
其他知识补充:
Qemu(quick emulator)是一个开源的托管虚拟机,通过纯软件来实现虚拟化模拟器,几乎可以模拟任何硬件设备。比如:Qemu可以模拟出一个ARM系统中的:CPU、内存、IO设备等,然后在这个模拟层之上,可以跑一台 ARM虚拟机,这个ARM虚拟机认为自己在和硬件进行打交道,但实际上这些硬件都是Qemu模拟出来的。Qemu是使用纯软件模拟的,它的强项是模拟那些不涉及到外部的具体硬件设备的场景。因为QEMU是纯软件实现的,所有的指令都要经过QEMU,使得性能很差,而配合KVM则可以解决这一问题。
参考资料 https://cloud.tencent.com/developer/article/1543689 https://yeasy.gitbook.io/docker_practice/buildx/multi-arch-images https://www.cnblogs.com/sewain/p/14206365.html
ERRORS
error-1 W: GPG error: https://developer.download.nvidia.cn/compute/cuda/repos/ubuntu1804/x86_64 InRelease: At least one invalid signature was encountered. E: The repository 'https://developer.download.nvidia.com/compute/cuda/repos/ubuntu1804/x86_64 InRelease' is not signed. N: Updating from such a repository can't be done securely, and is therefore disabled by default. N: See apt-secure(8) manpage for repository creation and user configuration details. W: GPG error: http://security.ubuntu.com/ubuntu bionic-security InRelease: At least one invalid signature was encountered. E: The repository 'http://security.ubuntu.com/ubuntu bionic-security InRelease' is not signed. N: Updating from such a repository can't be done securely, and is therefore disabled by default. N: See apt-secure(8) manpage for repository creation and user configuration details. W: GPG error: http://archive.ubuntu.com/ubuntu bionic InRelease: At least one invalid signature was encountered. E: The repository 'http://archive.ubuntu.com/ubuntu bionic InRelease' is not signed. N: Updating from such a repository can't be done securely, and is therefore disabled by default. N: See apt-secure(8) manpage for repository creation and user configuration details. W: GPG error: http://archive.ubuntu.com/ubuntu bionic-updates InRelease: At least one invalid signature was encountered. E: The repository 'http://archive.ubuntu.com/ubuntu bionic-updates InRelease' is not signed. N: Updating from such a repository can't be done securely, and is therefore disabled by default. N: See apt-secure(8) manpage for repository creation and user configuration details. W: GPG error: http://archive.ubuntu.com/ubuntu bionic-backports InRelease: At least one invalid signature was encountered. E: The repository 'http://archive.ubuntu.com/ubuntu bionic-backports InRelease' is not signed. N: Updating from such a repository can't be done securely, and is therefore disabled by default. N: See apt-secure(8) manpage for repository creation and user configuration details.
硬盘空间不足了
本博客所有文章除特别声明外,均采用 CC BY-SA 4.0 协议 ,转载请注明出处!